Setting Up Splitsense

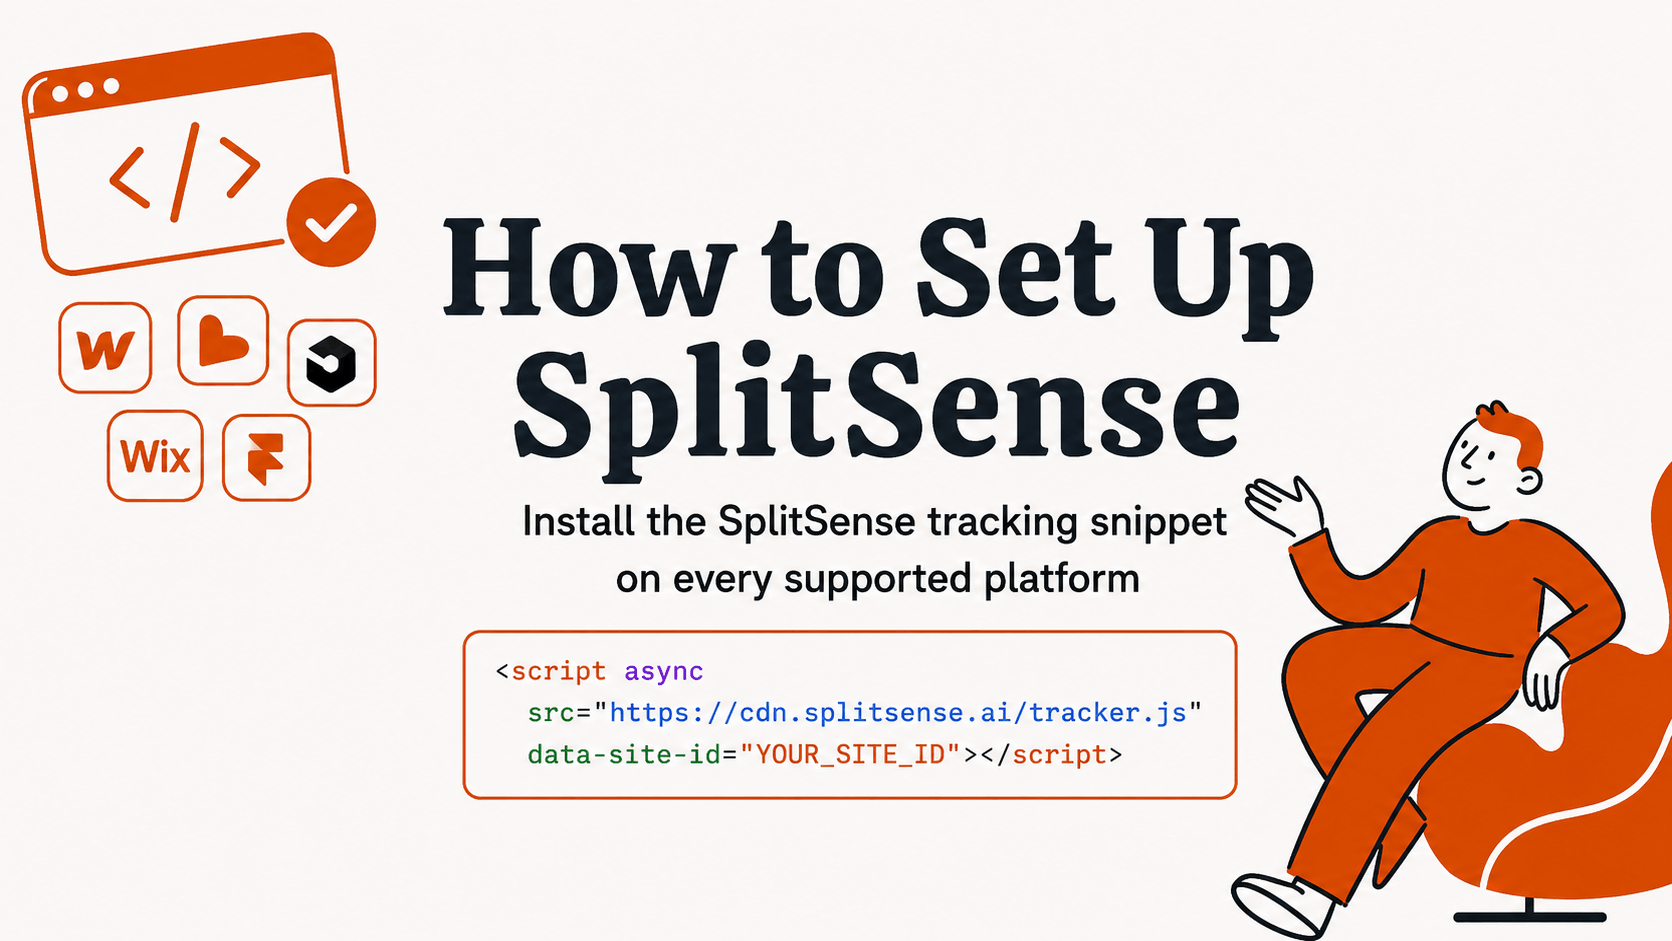
This guide walks you through installing the SplitSense tracking snippet on every platform supported by the installer: Custom Website, Webflow, Lovable, Cursor / v0 / Bolt, Wix, and Framer.
The script is the same across all platforms. In every case, the snippet belongs in the <head> section of your site so it loads before any of your page content renders. That early load is what lets SplitSense run experiments without a flash of the original variant.
Grab your snippet from your SplitSense dashboard before you start. It looks roughly like this:
<script async src="https://cdn.splitsense.ai/tracker.js" data-site-id="YOUR_SITE_ID"></script>
Keep that tab open, you'll paste it into one of the platforms below.
Custom Website (manual installation)
If you control the HTML of your site directly — a static site, a hand-built page, or any framework where you can edit the source — paste the snippet inside the <head> tag of your HTML.
<!DOCTYPE html>
<html lang="en">
  <head>
    <meta charset="UTF-8" />
    <title>Your site</title>

    <!-- SplitSense -->
    <script async src="https://cdn.splitsense.ai/tracker.js" data-site-id="YOUR_SITE_ID"></script>
  </head>
  <body>
    <!-- your content -->
  </body>
</html>
For multi-page sites, add the snippet to every page that should run experiments — or, better, put it in a shared header template / layout file so it applies site-wide. For frameworks:
- Next.js (App Router): add the snippet using the
<Script>component inapp/layout.tsxwithstrategy="afterInteractive", or directly in the<head>of your root layout. - Next.js (Pages Router): use
_document.tsxand place the<script>inside the<Head>component. - Nuxt / Vue: add it to
nuxt.config.tsunderapp.head.script, or toindex.htmlfor Vite-based projects. - SvelteKit: add it to
src/app.htmlinside<head>. - Astro / Remix / Gatsby: use the framework's head/document component and paste the snippet there.
Deploy your site, then open your live URL and check the SplitSense dashboard — you should see the install detected within a few seconds.
Webflow
Webflow has a built-in custom code section that's perfect for this. Site-wide custom code is a paid Webflow feature, so you'll need at least a Basic site plan or a paid Workspace plan on the new pricing.
- Open your project and click the Webflow logo (top-left of the Designer) → Site settings. You can also access it from your project dashboard.
- Go to the Custom code tab.
- Paste the SplitSense snippet into the Head code section.
- Click Save changes.
- Click Publish (top-right of the Designer) and publish to your live domain. Custom code only runs on published sites — not in the Designer preview.
A couple of things to know:
- Webflow's Head code section accepts up to 50,000 characters, far more than the SplitSense snippet needs.
- Don't wrap the snippet in extra
<head>or<html>tags — Webflow handles that automatically. Just paste the<script>tag as it appears in your dashboard. - Webflow sites with dynamic CMS pages still work fine — the snippet loads on every page.
To verify, visit your published .com (not the .webflow.io staging domain unless that's the domain you registered in SplitSense) and check your dashboard.
Lovable
Lovable builds Vite + React single-page apps, so the snippet goes into the index.html file at the root of your project. The easiest way is to ask Lovable's AI to do it for you.
Option 1 — Ask the AI (recommended):
Paste this prompt into Lovable's chat:
Please add this script tag to the<head>section ofindex.htmlso it loads on every page:
Lovable will edit index.html and rebuild. Publish your project once the change is applied.
Option 2 — Edit index.html directly:
If you've connected Lovable to GitHub or are editing code manually, open index.html in your project root and add the snippet inside the <head> tag:
<head>
  <meta charset="UTF-8" />
  <link rel="icon" type="image/svg+xml" href="/favicon.ico" />
  <meta name="viewport" content="width=device-width, initial-scale=1.0" />
  <title>Your app</title>

  <!-- SplitSense -->
  <script async src="https://cdn.splitsense.ai/tracker.js" data-site-id="YOUR_SITE_ID"></script>
</head>
A note on SPAs: because Lovable apps use client-side routing, the script only loads once on initial page load. SplitSense handles route changes internally, but if you're using a fresh integration, verify on your live deployed URL (not localhost) since some trackers ignore local dev environments.
Cursor / v0 / Bolt (AI website builders)
These tools all output real code you can edit, so the install is the same as any framework project — paste the snippet into the document <head>. The exact file depends on the framework the tool generated for you.
For v0 and Bolt projects (typically Next.js):
If your project uses the App Router (app/ directory), open app/layout.tsx and add the snippet inside the root layout's <head>:
import Script from "next/script";

export default function RootLayout({ children }: { children: React.ReactNode }) {
  return (
    <html lang="en">
      <head>
        <Script
          src="https://cdn.splitsense.ai/tracker.js"
          data-site-id="YOUR_SITE_ID"
          strategy="afterInteractive"
        />
      </head>
      <body>{children}</body>
    </html>
  );
}
If your project uses the Pages Router (pages/ directory), edit pages/_document.tsx:
import { Html, Head, Main, NextScript } from "next/document";

export default function Document() {
  return (
    <Html lang="en">
      <Head>
        <script
          async
          src="https://cdn.splitsense.ai/tracker.js"
          data-site-id="YOUR_SITE_ID"
        />
      </Head>
      <body>
        <Main />
        <NextScript />
      </body>
    </Html>
  );
}
For Cursor:
Cursor is just an editor — it works on whatever framework you've set up. Identify your project's root layout or index.html file, and follow the framework-specific guidance above (or the Custom Website section if it's a static site).
Pro tip: you can simply paste the SplitSense snippet into Cursor's chat with the prompt "Add this to the head of every page in this project" — Cursor will figure out which file to edit based on your project structure.
After editing, commit and redeploy (Vercel for v0, your platform of choice for Bolt and Cursor projects).
Wix
Wix supports custom head code through its Custom Code feature, but there's a catch: it requires a Premium plan with a connected custom domain. Free sites and Wix subdomains can't add custom scripts.
- Go to your site's dashboard (not the editor) on wix.com.
- Click Settings → in the Advanced section, click Custom Code.
- Click + Add Custom Code in the top-right.
- Paste the SplitSense snippet into the code box.
- Give it a name — e.g. SplitSense Tracker — so you can find it later.
- Under Add Code to Pages, choose All pages and select Load code once. (SplitSense initialises once and handles the rest.)
- Under Place Code in, select Head.
- Click Apply.
Verify on your live custom domain — Wix custom code doesn't run in the editor preview.
Important: Wix specifically calls out that some tracking scripts (Google Analytics, Meta Pixel, etc.) need to go through their dedicated Marketing Integrations rather than Custom Code. SplitSense is not in that list, so Custom Code is the correct path — but if you ever hit issues, it's worth checking whether Wix has added a direct integration.
Framer
Framer has a clean built-in custom code feature that handles this in a couple of clicks.
- Open your Framer project.
- Click the Framer logo (top-left) → Site Settings, or hit
⌘+/to open settings. - Go to the General tab and scroll to the Custom Code section. (In newer Framer versions, this lives under a dedicated Custom Code tab in the sidebar — click Add Script if it's your first one.)
- Click Show Advanced if you don't see all four code slots (Start/End of
<head>, Start/End of<body>). - Paste the SplitSense snippet into Start of
<head>tag (recommended for earliest loading). - Click Save.
- Publish your site — like all the other platforms, custom code only goes live after publishing.
A few Framer-specific notes:
- Framer sites behave like SPAs — page navigations don't trigger full reloads. SplitSense handles this internally, so experiments will continue running across routes, but the initial script load only happens once.
- The supported tags are
<link>,<script>,<meta>, and<style>—<script>is what you want. - If you want to track specific link clicks or form submissions as conversions, Framer exposes
framer:clickandframer:formsubmitevents you can listen for in a second script block.
After installing — verify the snippet is working
Whichever platform you used, do these checks once your site is live:
- Open your live site in an incognito/private window (to avoid cached versions and ad blockers).
- Open DevTools → Network tab → reload the page → filter for
splitsenseortracker.js. You should see the request return200. - Check your SplitSense dashboard — your install status should flip to "Connected" within a few seconds of the first pageview.
- Start a test experiment on a low-traffic page to confirm variants are served correctly before going wider.
If the install isn't detected:
- Make sure the site has been published (Webflow, Framer, Wix, Lovable all require a publish step).
- Check that you're on the domain you registered in SplitSense — staging domains (
.webflow.io,.framer.website,.lovable.app) often aren't authorised by default. - Confirm the
data-site-idmatches the one in your dashboard exactly. - Disable browser extensions that block third-party scripts (uBlock Origin, Privacy Badger, etc.) for the test.
Need help?
If you're stuck on any of the platforms above, our full installation guide and a chat-with-support button are available at docs.splitsense.ai. Your data is secure — SplitSense never collects sensitive personal information from your visitors.